The Manage Shipments Grid is a great place to check on shipment statuses and update shipments in a number of ways. To help you utilize this capability we’ve written these guidelines.
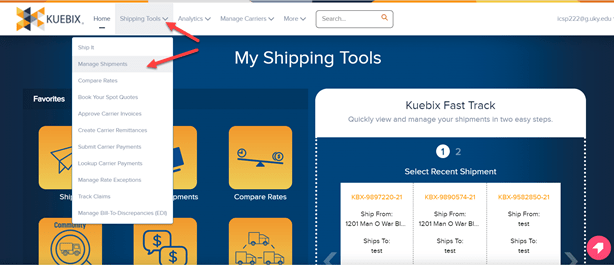
Once you’ve logged in to your Kuebix account, go to the “Shipping Tools” tab and select “Manage Shipments”.
Statuses
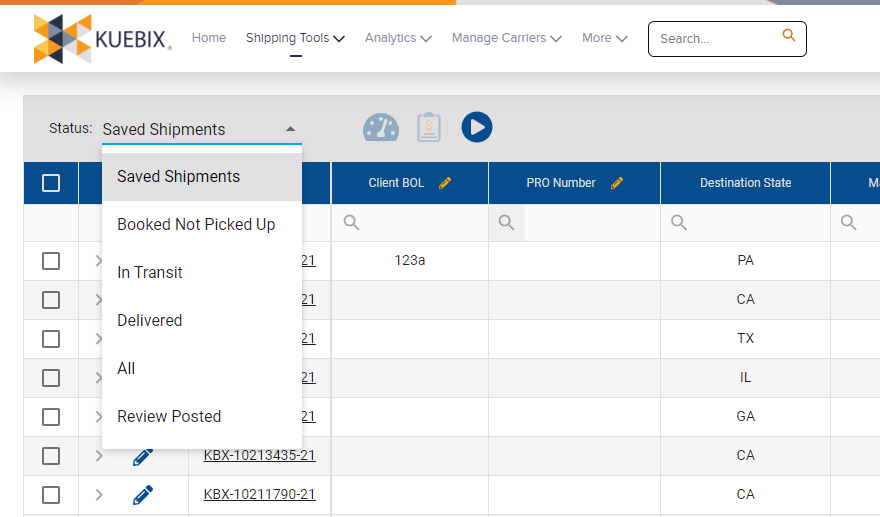
Select the Status option to change which shipments you see, and each status has different icons available.
- Saved Shipments: shipments that are in the process of being created, that have not been Booked, and/or do not have Spot/Volume rates requested.
- Booked Not Picked Up: shipments that have been Booked through Kuebix, and may or may not have been scheduled.
- In Transit: the carrier has picked up the shipment and is in route.
- Delivered: shipments the carrier has marked as delivered.
- All: All of the shipments that have been created, regardless of status.
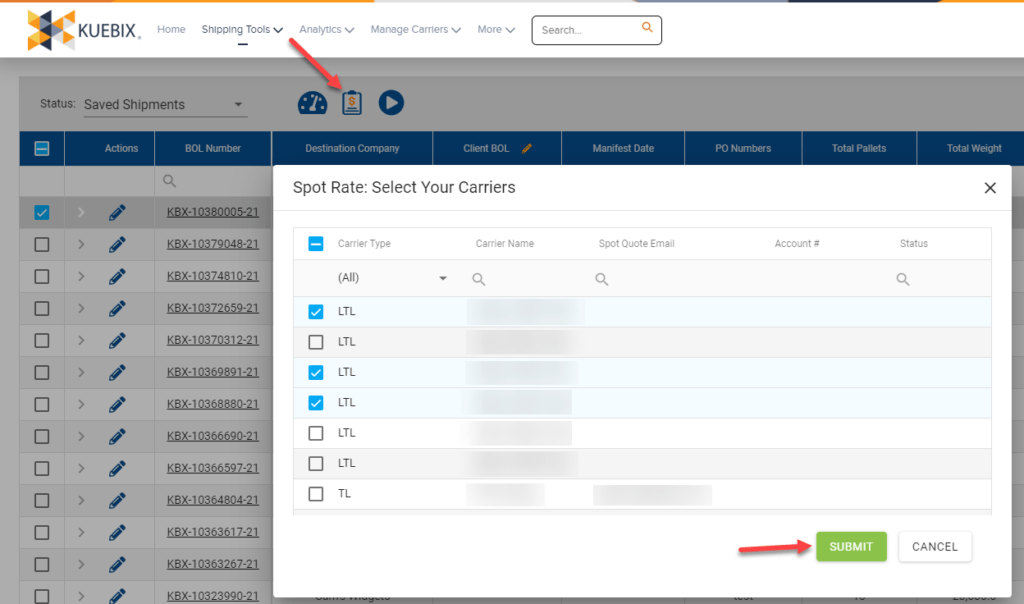
- Review Posted: If you have requested any Spot/Volume quotes, they will be visible here. For more information on booking Spot quotes from the Manage Shipments Grid please see the article Getting and Booking Spot Quotes.
Shipments will stay in the Manage Shipments Grid for 90 days. After 90 days the shipment can still be located using the search field in the menu bar.
Icons
All statuses will have icons along the top of the grid, as well as additional icons in line with the shipment itself.
There are icons on the far right side of the grid that are standard and do not change with the status.

Left to right, the first Icon brings up options available for which columns to include.
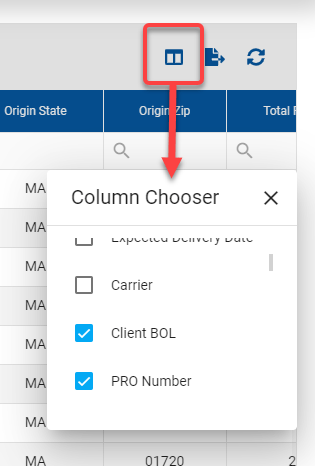
Clicking the check box next to the subject will add that column. Once the column is visible in your view, you can click on the column title and drag it to your desired position. The column width can also be adjusted.
The view is user specific and will persist until it is changed again.
The center icon exports all of the information in the current status screen as a .csv file.
The rightmost icon refreshes your manage shipments grid without reloading the entire page.
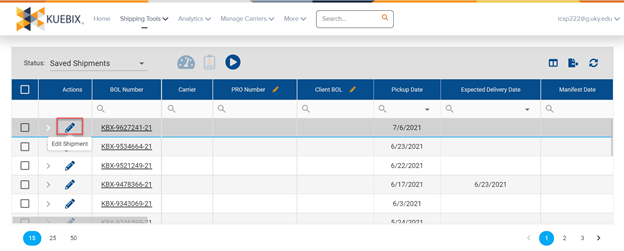
Saved Shipment Icons
To edit a shipment, click on the pencil icon next to the BOL number that you would like to edit.
This will open the shipment in a new tab in your browser.
Shipment Specific Menu Bar Icons
Clicking the check box will enable the icons at the top, allowing you to perform additional functions.
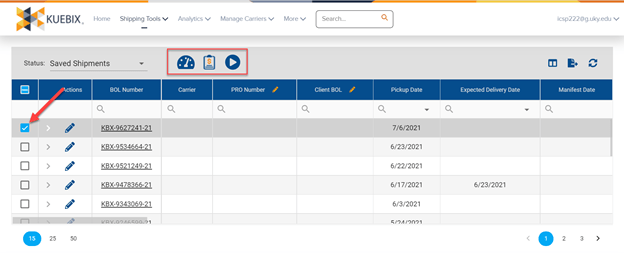
On the left, the speedometer icon automatically updates the mileage when clicked.
In the center, the clipboard icon lets you create spot rates for the selected shipment, and opens a pop up to add information.
On the right, the play icon links to the Manage Shipment Grid tutorial video.
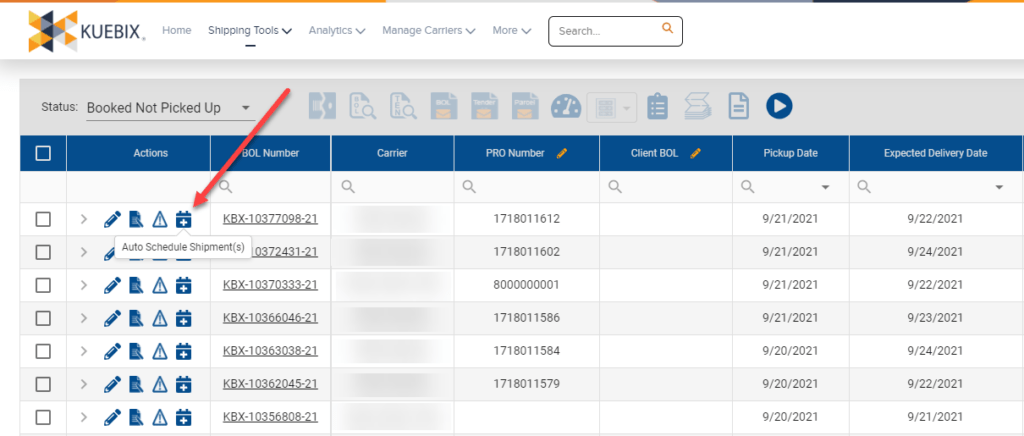
Booked Not Picked Up Icons

Similar to the Saved Shipments status, the Pencil Icon in the left column allows you to edit the shipment. If any edits/updates are necessary after booking, please reach out to the carrier directly to let them know.

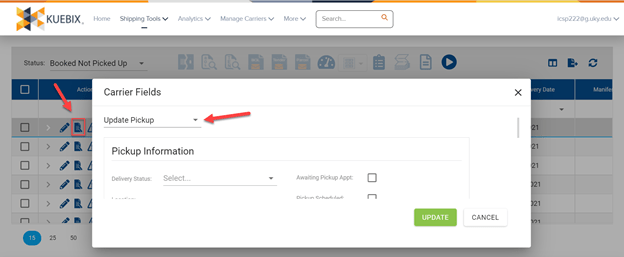
The next icon (going left to right) is the Edit Carrier Fields, enabling you to manually update the pickup and delivery information for that selected shipment. Once the information is filled in, click Update to submit the changes.

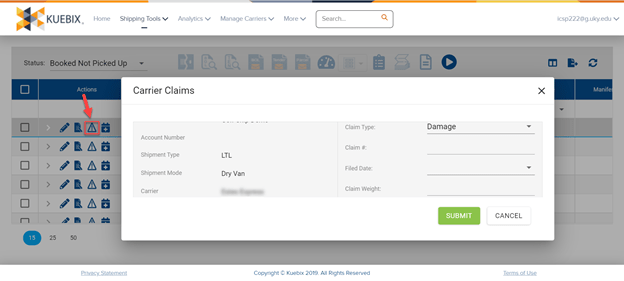
The third icon is to submit carrier claims, and opens a pop up to fill out all necessary information.

The right most icon is the Calendar icon, and will auto-schedule the shipment. Please note that once the icon is clicked, the shipment will be sent to the previously booked carrier.
Shipment Specific Menu Bar Icons
Selecting the check box to the left of any shipment will highlight the icons at the top, enabling additional functions related to the selected shipment. *Certain buttons will only be available for a specific shipment type, e.g. LTL, TL, Multileg, or Parcel.
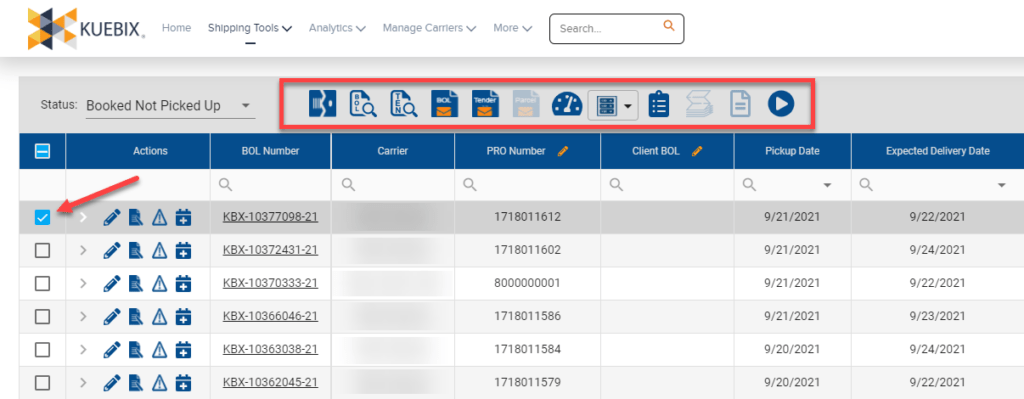

Unbooks the selected shipment, clicking the icon brings up unbooking reasons. Select the corresponding reason and click “Unbook” to complete.
View the BOL – opens as a PDF in your browser or default pdf viewer.

View the tender – opens as a PDF in your browser or default pdf viewer.
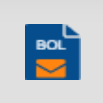
Email the BOL from the Manage Shipments Grid.
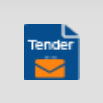
Email the tender from the Manage Shipments Grid.

*This becomes a clickable option if the shipment selected is a parcel shipment, and allows you to email the Parcel labels.

Automatically updates the shipment mileage when clicked.
Either print or email the shipping labels.

View the packing list.

*This is actionable after selecting Parcel shipments, and lets you View and Print the Shipping Label for the selected Parcel shipment(s).

*Get the Manifest for the selected shipment.

Play the Manage Shipments Grid tutorial video.
In Transit, Delivered, and All Icons
The icons are the same as those for the Booked Not Picked Up screen, save that since the shipment has already been scheduled, the Calendar icon is swapped for the View Documents icon.

Clicking on the View Documents icon allows you to either see the existing Delivery Receipt and/or Bill of Lading, or request the documents from the carrier.
Shipment Specific Menu Bar Icons
These are the same as those offered on the Booked Not Picked Up screen, and have the same functions.
Review Posted Icons
Once spot rates are returned by the carrier, the Book icon becomes available. Clicking the Book icon notifies the carrier that their quote has been accepted.
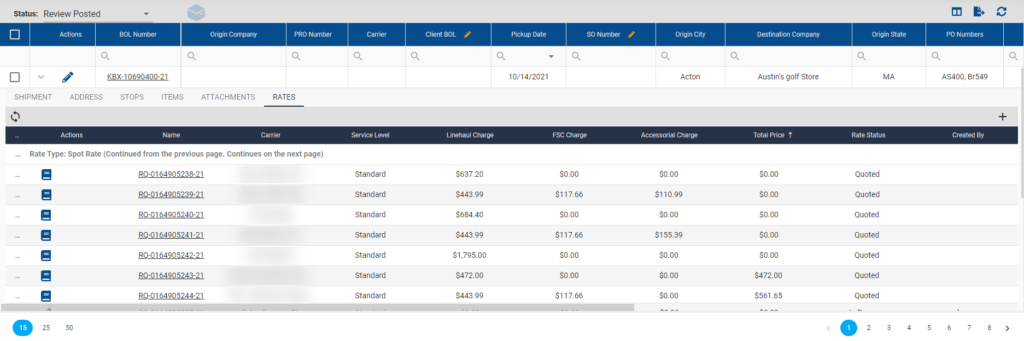
Actions and Tabs
In the Actions column, to the left of the BOL number, is a little chevron that points to the right. Clicking on the chevron opens up the shipment fields, allowing you to see and edit most information quickly, without having to reopen the Ship It page.
The chevron is available on all Manage Shipment pages, and has the consistent options of Shipment, Address, Stops, Items, Attachments, and Rates.

Shipment
The Shipment tab shows the basic information for the shipment – the delivery status, pick up number, total weight, handling units, packages, units, the shipment rate, and the Client BOL.

Address
The Address tab shows the origin, destination, and bill to details that were provided when the shipment was created.

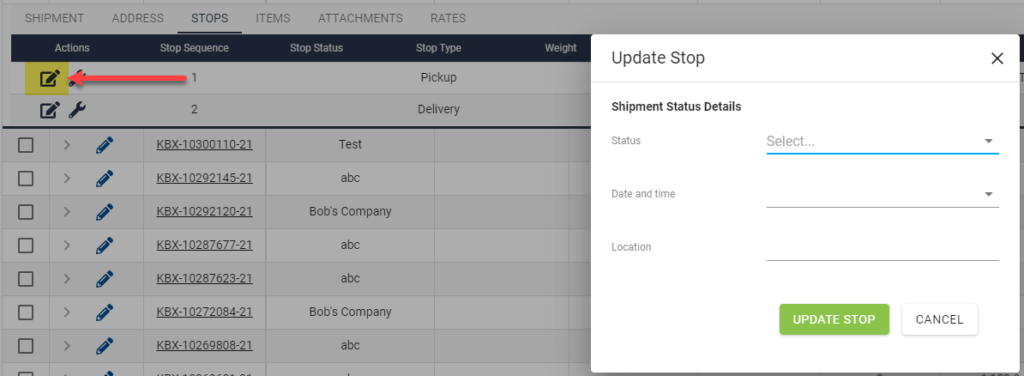
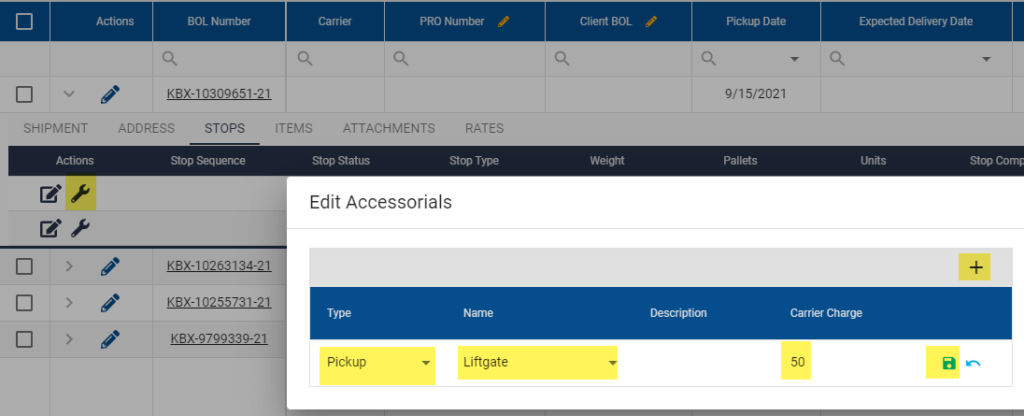
Stops
The Stops tab shows basic pickup and delivery information. Also, you can easily update the status (using the pencil + paper icon), or add accessorials (using the wrench).

Shipment Status
To manually update the shipment status, click the pencil + paper icon, enter the desired information, and click “Update Stop”.
Accessorial
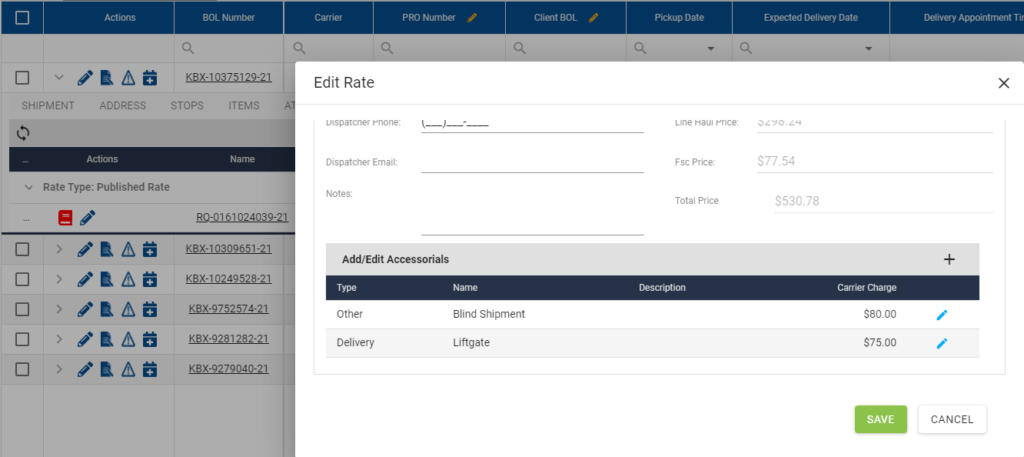
To add an accessorial, click the wrench for the corresponding origin or destination to which the accessorial should apply. This opens a popup window, select the + to add a new accessorial. Once you choose Pickup or Delivery, there will be a list of accessorial types to select. Enter the price in just numbers and click the save icon.
Items
See any line items at a glance.

Attachments
Any documentation that you’d like associated with the shipment can be uploaded here.

Rates and Booking
Shipments can be booked right from your Manage Shipments Grid.
Rates are sorted by Rate Type, and will have additional pages if needed. Clicking on any of the column titles will sort the results by that column, in either ascending or descending values.
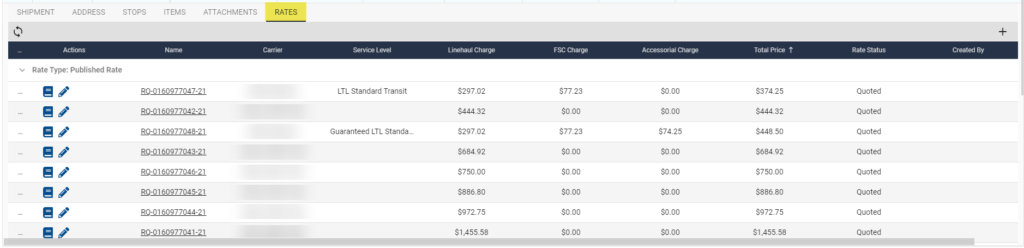
To book a shipment, click the book icon on the left. Once successful, the shipment will move from the Saved Shipments screen, to the Booked Not Picked Up screen, and the Book icon will become red.

Now you can either click the Calendar icon to autoschedule the shipment, or you can unbook by clicking the red Book icon.
Selecting the pencil icon opens a new window so you can edit the quote number, add notes, or add/edit accessorials.